Contact
Write to Us And We Would Be Happy to Advise You.
Do you have any questions, or would you like to speak directly with a representative?
By peter
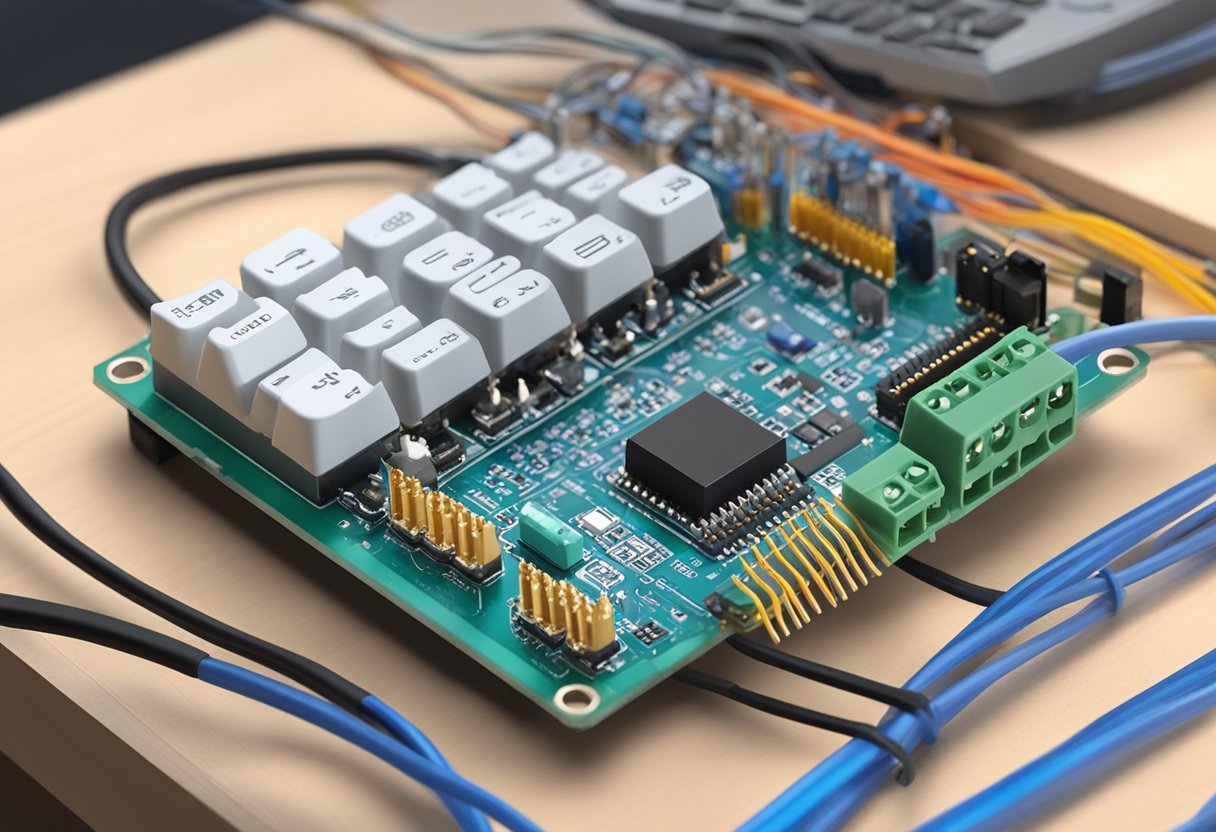
If you’re looking to create a simple user interface for your Arduino project, a 4×4 membrane keypad might be just what you need. This type of keypad consists of four rows and four columns of buttons that can be used to input data or commands. With the help of an Arduino microcontroller, you can easily interface with the keypad and use it to control your project.

To get started with a 4×4 membrane keypad and Arduino, you’ll need to connect the keypad to your Arduino board using jumper wires. Once connected, you can write a program that reads the state of each button on the keypad and performs an action based on the button pressed. This could be as simple as turning an LED on or off, or as complex as controlling a robot or other device.
There are many tutorials and resources available online that can help you get started with a 4×4 membrane keypad and Arduino. With a little bit of programming knowledge and some basic electronics skills, you can create a customized user interface for your project that is both easy to use and functional.

A 4×4 membrane keypad is a type of input device that allows you to enter data into an electronic system. It consists of a set of buttons arranged in a 4×4 matrix, with each button representing a unique combination of row and column. When you press a button, it completes an electrical circuit between the corresponding row and column, which the system can detect and interpret as a specific input.
The membrane keypad is made up of several layers, including a top membrane layer, a bottom membrane layer, and a spacer layer in between. The top membrane layer contains the buttons, which are made of conductive material and have symbols printed on them. The bottom membrane layer contains the rows and columns, which are also made of conductive material. The spacer layer separates the two membrane layers and helps to maintain a consistent distance between them.
There are two main types of 4×4 membrane keypads: matrix and individual. Matrix keypads have all the buttons connected in a single matrix, while individual keypads have each button connected separately. Matrix keypads are more common and easier to use, as they require fewer pins to connect to the system. Individual keypads, on the other hand, allow for more flexibility in terms of customization and programming.
In addition to the standard 4×4 keypad, there are also other variations available, such as 3×4 and 4×3 keypads. These keypads have a different number of rows and columns, but operate in the same way as the 4×4 keypad. Some keypads also have additional features, such as backlighting, which can make them easier to use in low-light conditions.
Overall, 4×4 membrane keypads are a simple and effective way to input data into an electronic system. Whether you are building a DIY project or working on a commercial product, understanding the components and functionality of these keypads can help you choose the right one for your needs and ensure that it works correctly with your system.
To integrate a 4×4 membrane keypad with your Arduino, you will need a few materials and follow a wiring guide.
Here are the materials you will need to integrate a 4×4 membrane keypad with your Arduino:
Follow these steps to wire your 4×4 membrane keypad with your Arduino:
Once you have wired your 4×4 membrane keypad with your Arduino, you can start coding to read the input from the keypad. With the correct code, you can use the keypad to control your Arduino projects and create interactive user interfaces.
When it comes to programming the Arduino for the 4×4 membrane keypad, there are a few things you need to keep in mind. In this section, we will discuss the steps you need to take to program the Arduino for the keypad.
The first step is to set up the Integrated Development Environment (IDE) for the Arduino. You need to download and install the Arduino IDE from the official Arduino website. Once you have installed the IDE, you need to connect your Arduino board to your computer using a USB cable.
After setting up the IDE, you need to write the code to program the Arduino for the 4×4 membrane keypad. The code for the keypad is relatively simple, and you can find many examples online. You need to define the pins for the keypad and the functions to read the input from the keypad. You can also define the functions to display the input on an LCD screen or send it to a computer using serial communication.
Another option is to use a library for the 4×4 membrane keypad. A library is a collection of pre-written code that you can use in your project. There are many libraries available for the 4×4 membrane keypad, such as the Keypad library by Mark Stanley and Alexander Brevig. To use a library, you need to download it from the internet and install it in the Arduino IDE. Once you have installed the library, you can use the pre-written code to program the Arduino for the keypad.
In conclusion, programming the Arduino for the 4×4 membrane keypad is a straightforward process. You can either write the code yourself or use a library to simplify the process. With the right tools and knowledge, you can easily program the Arduino for any project that requires a 4×4 membrane keypad.
If your 4×4 membrane keypad is not working as expected, don’t worry. This section will help you troubleshoot some common issues and provide debugging tips to help you get your keypad up and running.
Here are some common issues you may encounter when working with a 4×4 membrane keypad and their possible causes:
| Issue | Possible Cause |
|---|---|
| Keypad not responding | Loose or incorrect wiring, incorrect code, damaged keypad |
| Wrong key output | Loose or incorrect wiring, incorrect code |
| Ghosting or jamming | Insufficient debounce time, insufficient pull-up resistor, damaged keypad |
Here are some tips to help you debug your keypad:
By following these troubleshooting tips, you should be able to identify and fix any issues you encounter when working with a 4×4 membrane keypad and Arduino.
Once you have mastered the basics of interfacing a 4×4 membrane keypad with an Arduino, you can move on to more advanced applications. In this section, we will explore some of the custom functions and project ideas that you can implement with a 4×4 membrane keypad and an Arduino.
One of the most exciting things about using a 4×4 membrane keypad with an Arduino is that you can program custom functions for each button. For example, you could assign a button to turn on a specific LED or to start a motor. You could also use a button to activate a specific sequence of actions, such as turning on a fan and then opening a window.
To program custom functions for your keypad, you will need to use the Arduino IDE and write some code. The code will typically involve assigning a specific pin to each button and then writing a function that is triggered when that button is pressed. You can find many tutorials and examples online that will help you get started with programming custom functions for your 4×4 membrane keypad.
If you are looking for inspiration for projects that you can build with a 4×4 membrane keypad and an Arduino, here are a few ideas to get you started:
These are just a few examples of the many projects that you can build with a 4×4 membrane keypad and an Arduino. With a little creativity and some programming skills, the possibilities are endless.
Do you have any questions, or would you like to speak directly with a representative?