Contact
Write to Us And We Would Be Happy to Advise You.
Do you have any questions, or would you like to speak directly with a representative?
By hqt

A membrane switch is a type of electrical switch that is made up of several layers of materials, such as polyester, adhesive, and conductive inks. These switches are commonly used in electronic devices, appliances, and industrial control panels, where they provide a reliable and low-cost interface for user input.
Here are the basic steps for making a membrane switch:
As a professional engineer with years of experience in designing and manufacturing membrane switches, I am excited to share with you a step-by-step guide on how to make a membrane switch in five easy steps. Membrane switches are thin and flexible electronic devices that are widely used in various industries, including medical, military, aerospace, automotive, and consumer electronics. They are popular because of their low profile, durability, and versatility. In this article, I will walk you through the materials needed and the step-by-step process of making a membrane switch.
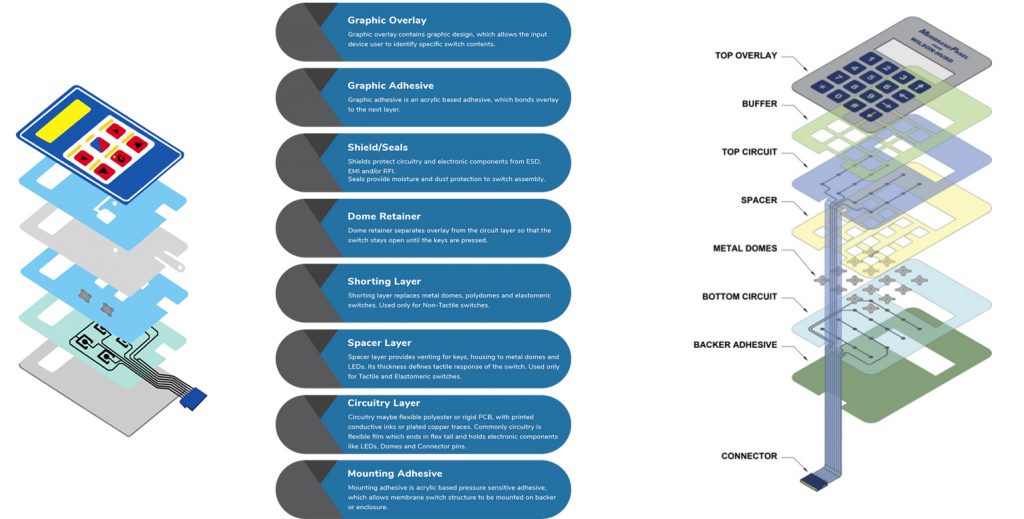
A membrane switch is a low voltage electrical switch that is made up of several layers of material, including a graphic overlay, adhesive spacer, circuit layer, and backer. It is a user interface device that allows the user to control the electronic device by pressing the buttons or keys on the graphic overlay. The circuit layer is printed with conductive ink that connects the buttons to the electronic device. Membrane switches are commonly used in applications where durability and reliability are crucial, such as medical equipment, industrial controls, and aerospace instrumentation. They are also used in consumer electronics, such as remote controls, calculators, and digital cameras.
Before we dive into the step-by-step process of making a membrane switch, let’s first take a look at the materials needed. The materials needed for making a membrane switch include:
Other materials needed include a printer, conductive adhesive, cutting tools, and a test apparatus. The printer is used to print the circuit layer on the polyester film, while the conductive adhesive is used to attach the circuit layer to the adhesive spacer. The cutting tools are used to cut the layers into the desired shape, while the test apparatus is used to test the functionality of the membrane switch.
The first step in making a membrane switch is to design the graphic overlay. The graphic overlay should be designed to meet the specific requirements of the application. It should include clear and concise symbols and graphics that indicate the function of each button or key. The graphic overlay should also be designed with the target audience in mind. For example, if the membrane switch is for medical equipment, the graphic overlay should be designed with medical professionals in mind.
The next step is to design the circuit layer. The circuit layer should be designed to match the layout of the graphic overlay. The circuit layer should include conductive traces that connect the buttons or keys to the electronic device. The conductive traces should be designed to meet the specific requirements of the application. For example, if the membrane switch is for a high-frequency application, the conductive traces should be designed to minimize the impedance.
The second step in making a membrane switch is to print the circuitry. The circuitry is printed on a clear polyester film with a printer. The printer uses conductive ink to print the circuitry on the polyester film. The circuitry should be printed with precision and accuracy to ensure the functionality of the membrane switch.
After the circuitry is printed, it is important to inspect it for any defects or errors. Any defects or errors should be corrected before proceeding to the next step.
The third step in making a membrane switch is to prepare the membrane layers. The membrane layers include the graphic overlay, adhesive spacer, circuit layer, and backer. Each layer should be cut to the desired shape and size using cutting tools.
After the layers are cut, the adhesive spacer should be attached to the circuit layer using conductive adhesive. The conductive adhesive should be applied evenly to ensure the conductivity of the membrane switch.
The fourth step in making a membrane switch is to assemble the membrane switch. The membrane layers should be assembled in the following order: backer, circuit layer with adhesive spacer, and graphic overlay. The layers should be aligned correctly to ensure the functionality of the membrane switch.
After the layers are assembled, the membrane switch should be inspected for any defects or errors. Any defects or errors should be corrected before proceeding to the next step.
The final step in making a membrane switch is to test the membrane switch. The membrane switch should be tested for its functionality using a test apparatus. The test apparatus should simulate the electronic device to ensure the functionality of the membrane switch.
The membrane switch should be tested for its durability and reliability. The test apparatus should simulate the environmental conditions in which the membrane switch will be used. The membrane switch should also be tested for its electrical properties, such as the resistance and the capacitance.
To make a successful membrane switch, it is important to follow these tips:
To avoid common mistakes when making a membrane switch, it is important to:
In conclusion, making a membrane switch is a complex process that requires precision, accuracy, and attention to detail. By following the step-by-step instructions in this article and avoiding common mistakes, you can make a successful membrane switch that meets the specific requirements of your application. If you need any assistance in designing and manufacturing a membrane switch, feel free to contact us for professional advice and support.
Do you have any questions, or would you like to speak directly with a representative?